CHEMISTRY CHAPTER ZERO
Making Apparatus for Density Demonstrations
The simple pieces of apparatus here are part of a sequence of demonstrations intended to lead steachers and students to the understanding that the word "buoyancy" disguises the effects of gravity in "float or sink" demonstrations and presentations. |
|
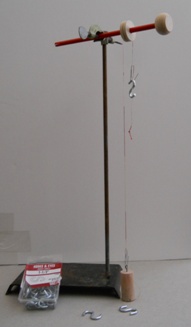
Materials/Equipment Required ring stand and clamp |
|
INSTRUCTIONS |
|
1. The idea is to have one weight (the dowel) that goes up and a variable weight (successive addition of S-hooks) that goes down. This demo will lead to the idea that in a "float or sink" demo, the object goes down adn the liquid goes up. I found it hard to find a low firction pulley -- the Fiddlestix® rod and pulley work "well enough". |
 |
2. The next demo shows that when the floating dowel goes down the water goes up. The ruler shows the scale. The plastic tube needs to be about twice the length of the dowel.. The plug for the plastic tube is the cap from a 2 liter plastic soda bottle. |
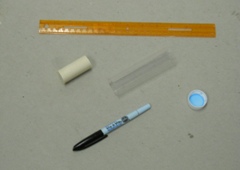 |
3. Use the glue gun to put a heavy bead of glue on the side of the bottle cap -- all the way round. Push the cap into the plastic tube and let it cool. It is difficult to fix a leak, so use plenty of glue anmd do it right the first time.. Color the water that you will use. It is probably a good idea to draw water from the tap and add the coloring in front of the students, just to emphasize that there are no hidden effects. |
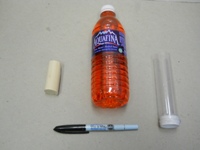 |
4. Fill the plastic tube about half full. Use the marker to record this level. Watchful folks will note that my tube leaked. Fie!. |
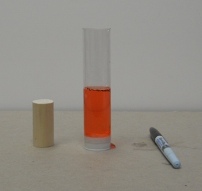 |
5. Put the dowel in the tube. The water level clearly goes up. This always happends, but when the container is large, the effect is difficult to see. The point of this demo is to drive home the observation that the dowel goes down and the liquid level goes up. [Like the weights!!] |
 |
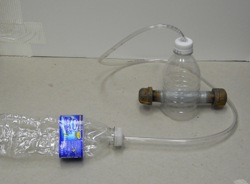
5. Drill a 1/4" hole in each of the bottle caps, and force the Tygon tubing into the holes. Use the glue gun to seal the tubing into the cap [No leask!] Cut the bottom off one of the bottles, and cut two holes in the sides of the bottle to let the iron pipe go through. No need to make these a tight fit. Assemble as shown. Place the submarine in a sink or contaier with about a foot of water. Squeexe the external water bottle to push air into the submarine, and it surfaces. Release the pressure on the external bottle, and the submarine dives. I built the submarine so that students can see the air displace water from the space between the "outer hull" and the "pressure hull". I rant against "Cartesian divers" because students cannot see the change in the water leve. |
 |
Suppliers (I have no financial interest in any of the suppliers mentioned.) Tygon tubing,dowels, plastic tube, S-hooks, and pipe – any hardware store. I got mine at Home Depot. Glue gun (high heat) and glue sticks (0.28” diameter, multi-heat). Any crafts store. I got mine at Walmart. Fiddlestix - Amazon If you are in a bind, contact Lynn Melton. 500 mL water bottles, string, paper clips, food coloring – grocery store, Home Depot, etc. |
|
Enough, enough!
Show me how you can help me learn chemistry!